Battery switch on travel trailer function is crucial for managing your RV’s power. Understanding how your battery switch works is key to preventing dead batteries, protecting your appliances, and extending the life of your electrical system. This guide will walk you through the different types of switches, their functions, and how to troubleshoot common problems. We’ll cover everything from safe connection procedures to routine maintenance, ensuring you’re equipped to handle any situation on the road.
We’ll explore various switch types, including their advantages and disadvantages, and show you how to safely connect and disconnect your batteries. We’ll also delve into troubleshooting, maintenance, and the interaction between your battery switch and other electrical components like your converter, inverter, and solar panels. By the end, you’ll be a battery switch pro!
Battery Switch Maintenance and Upkeep: Battery Switch On Travel Trailer Function
Keeping your travel trailer’s battery switch in top condition is crucial for reliable power and to prevent costly repairs down the road. Regular maintenance ensures your batteries stay charged and ready when you need them, preventing frustrating breakdowns on your adventures. Neglecting this simple component can lead to corrosion, poor connections, and ultimately, battery failure.Proper maintenance of your battery switch involves a straightforward routine of cleaning, inspection, and occasional testing.
This preventative approach will significantly extend the lifespan of your switch and minimize the risk of electrical problems. Remember, a well-maintained battery switch is a small investment that yields significant returns in peace of mind and reliable power.
Cleaning and Inspection Procedures
Regular cleaning is key to preventing corrosion build-up, a common enemy of battery switches. Start by disconnecting the battery cables from the switch. Use a wire brush or a specialized battery terminal cleaner to remove any dirt, grime, or corrosion from the switch terminals and the cable ends. Pay close attention to any crevices where corrosion might accumulate.
After cleaning, apply a corrosion inhibitor to all cleaned surfaces, ensuring a protective barrier against future corrosion. Visually inspect the switch itself for any signs of damage, such as cracks or loose components. If you find any damage, it’s best to replace the switch rather than risk electrical failure.
Testing the Battery Switch, Battery switch on travel trailer function
Periodically testing your battery switch ensures it’s functioning correctly. With the battery cables connected, use a multimeter to check the voltage across the switch terminals in both the “on” and “off” positions. In the “on” position, you should read a voltage close to the battery’s voltage. In the “off” position, the voltage should be near zero. A significant voltage drop in the “off” position indicates a problem with the switch and may require replacement.
So, you’re planning a trip? Awesome! First things first, get yourself sorted with travel insurance. Check out Aon travel insurance for some solid options; they’ve got you covered for a lot of eventualities. Then, if you’re hitting the road in a travel trailer, make sure you understand the battery switch on travel trailer function – knowing how to manage your power is key for a smooth trip.
Don’t get caught out with a dead battery! Happy travels!
If you’re unsure about using a multimeter, consult an automotive or RV specialist.
Lubrication and Corrosion Inhibition
Using appropriate lubricants and corrosion inhibitors is vital for long-term battery switch health. A dielectric grease, specifically designed for electrical connections, is ideal for lubricating the switch terminals and preventing corrosion. Apply a thin layer of this grease to the terminals after cleaning, ensuring a good electrical connection while protecting against moisture and corrosion. Avoid using petroleum-based lubricants, as these can attract dirt and damage the switch’s internal components.
So, you’re planning a trip? Awesome! First things first, sort out your travel insurance. Check out Aon travel insurance for comprehensive coverage. Then, if you’re hitting the road in a travel trailer, make sure you understand the battery switch on travel trailer function – it’s crucial for keeping your lights and appliances running.
Knowing how to use this switch can save you a lot of headaches (and potentially a dead battery) on the road!
Many marine-grade corrosion inhibitors are suitable and can be applied to the entire switch housing for added protection, especially in humid or salty environments. Remember to follow the manufacturer’s instructions for both the lubricant and the corrosion inhibitor.
Battery Switch and its Interaction with other Electrical Components

Your travel trailer’s battery switch acts as a central control point, dictating the flow of power between your batteries and the various electrical systems. Understanding its interaction with other components is crucial for safe and efficient operation. This section details how the switch affects the power pathways within your RV’s electrical setup.The battery switch’s primary role is to connect or disconnect your house batteries from the rest of the trailer’s electrical system.
This allows you to isolate the batteries for maintenance, storage, or in case of a problem, preventing unwanted drain or potential short circuits. When engaged, it allows power to flow from your batteries to feed other systems, while disengaging it cuts off that flow.
Power Flow with the Battery Switch Engaged
With the battery switch engaged, power from your house batteries can flow to several components. The converter, a crucial component, transforms 12-volt DC power from the batteries into 120-volt AC power, supplying your outlets and appliances. Simultaneously, the inverter (if equipped) converts 12-volt DC battery power into 120-volt AC power, providing a backup AC power source, typically for higher-power demands.
Finally, if you have a solar panel system, the solar charge controller will regulate the power generated by the solar panels and charge your batteries. In essence, the engaged battery switch allows a complete electrical circuit, connecting the batteries to the entire system, enabling normal operation.
Power Flow with the Battery Switch Disengaged
When the battery switch is disengaged, the house batteries are completely isolated from the rest of the electrical system. The converter will still function, drawing power from the shore power connection (if plugged into a campsite’s electrical hookup) or from the generator, bypassing the batteries entirely. The inverter will be inactive as it lacks the 12V DC input from the batteries.
Solar panels will continue to generate power, but the charge controller will either cease charging or direct the power elsewhere (depending on the specific system design), preventing overcharging of the disconnected batteries. This isolation protects your batteries from unintended discharge and allows for safe maintenance.
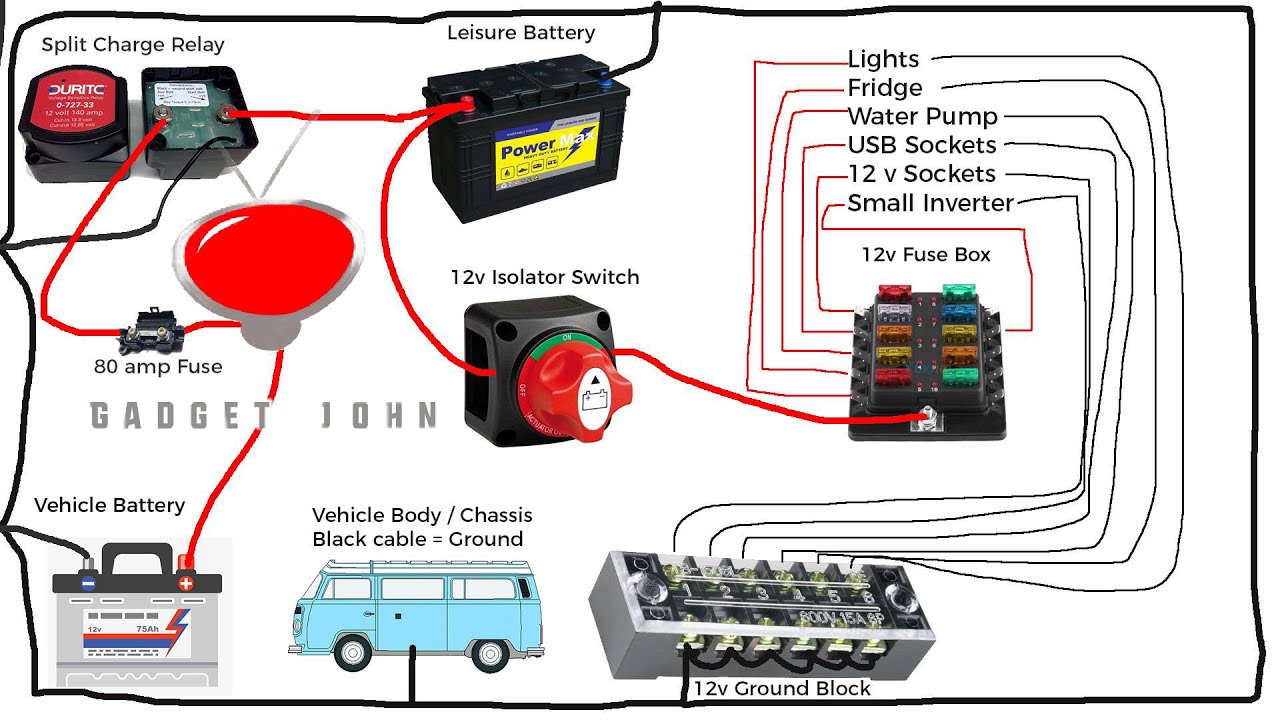
Simplified Electrical Pathway Diagram
Imagine this: Your batteries are represented by a circle labeled “Batteries.” From this circle, a line leads to a rectangle labeled “Battery Switch.” This switch has two positions, “ON” and “OFF.” From the “ON” side of the switch, multiple lines branch out. One line goes to a rectangle labeled “Converter,” another to a rectangle labeled “Inverter,” and a third line goes to a rectangle labeled “Solar Charge Controller,” which in turn connects to a circle labeled “Solar Panels.” Finally, from the converter, another line branches to a rectangle labeled “AC Outlets and Appliances.” When the switch is “OFF,” the lines from the “ON” side are effectively disconnected, isolating the batteries.
Mastering your travel trailer’s battery switch is essential for a smooth and worry-free RV experience. From preventing unexpected power outages to performing simple maintenance, understanding its function and proper use ensures the longevity of your batteries and overall electrical system. Remember to regularly inspect for corrosion, maintain clean connections, and follow safety procedures. With a little know-how, you’ll confidently manage your power and enjoy many happy trips!
Expert Answers
What happens if my battery switch is left in the “off” position?
Leaving the switch off completely disconnects your house batteries from the rest of the electrical system. This prevents power drain but also means you won’t have power to appliances or lights.
How often should I clean my battery switch?
Ideally, inspect and clean your battery switch at least twice a year, or more often if you notice corrosion.
Can I use any type of lubricant on my battery switch?
No, use only dielectric grease designed for electrical connections. Other lubricants can attract dirt and damage the switch.
What should I do if my battery switch feels loose or wobbly?
A loose switch could indicate a problem with the mounting or internal components. It’s best to have it checked by a professional.
